
Introduction
In this tutorial, you will learn how to integrate the Go-UPC API with FlutterFlow. Go-UPC is a platform for product data management, offering access to detailed information through UPC, EAN, and ISBN barcodes. Integrating the Go-UPC API into your application allows you to display accurate product details, enhancing the user experience and enabling informed decision-making.
Prerequisites
- FlutterFlow Account: Ensure you have an active FlutterFlow account to develop and test the application.
- Go-UPC API Key: Obtain a valid API key from Go-UPC. For more information, visit the Go-UPC API documentation.
- Basic Knowledge of FlutterFlow: Familiarity with FlutterFlow's interface and API call setup is recommended.
- Understanding of REST APIs: General knowledge of how RESTful APIs work.
- Development Tools: Use an up-to-date web browser, preferably Google Chrome, to access FlutterFlow and the API documentation.
Step-by-Step Guide
1. API Call Configuration
- Access FlutterFlow and open your project.
- Navigate to the "API Calls" section from the left sidebar.
- Create a new API call by clicking "Create API Call."
- Set the API Call Name to "Get Product Info" or any preferred name.
- Choose
GETas the Method Type. - Enter the Base URL as:
https://go-upc.com/api/v1/code/[UPC_CODE]
where[UPC_CODE]will dynamically replace the actual UPC code.
2. Adding Headers
-
Add an Authorization header with the following details:
- Name:
Authorization - Value:
Bearer [Your_API_Key]
Example:
- Name:
Authorization: Bearer f8a2c9d1e6b7a04d2c5f3b4a8c0e9d7f1a2b3c4e5d6f7a8b9c0d1e2f3a4b5c63. Testing the API
-
In the API testing section, enter a barcode number in the Value field and click
"Test API Call" to verify that the data is returned correctly.
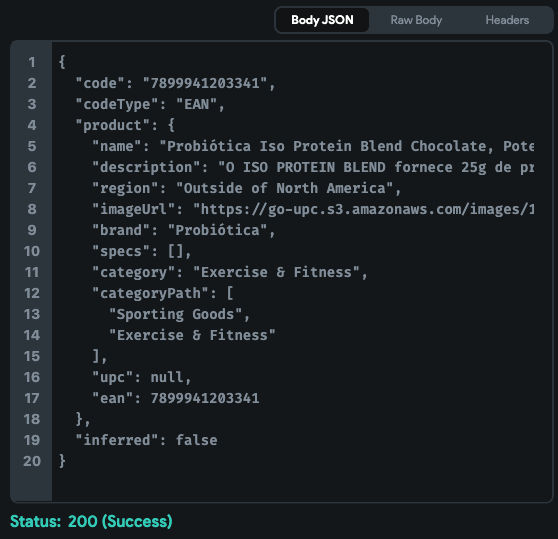
4. Data Mapping and Display
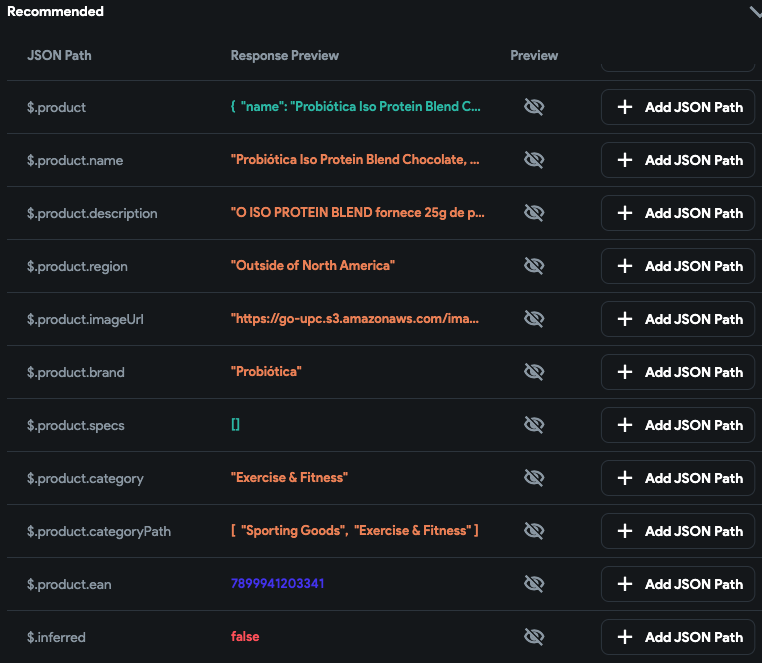
- Click on "+ Add JSON Path" to map the data.
- Use clear and descriptive names for the JSON Paths, ensuring each path within an API call has a unique name.
- After adding JSON Paths, click "Save."
5. Creating App State Variables
-
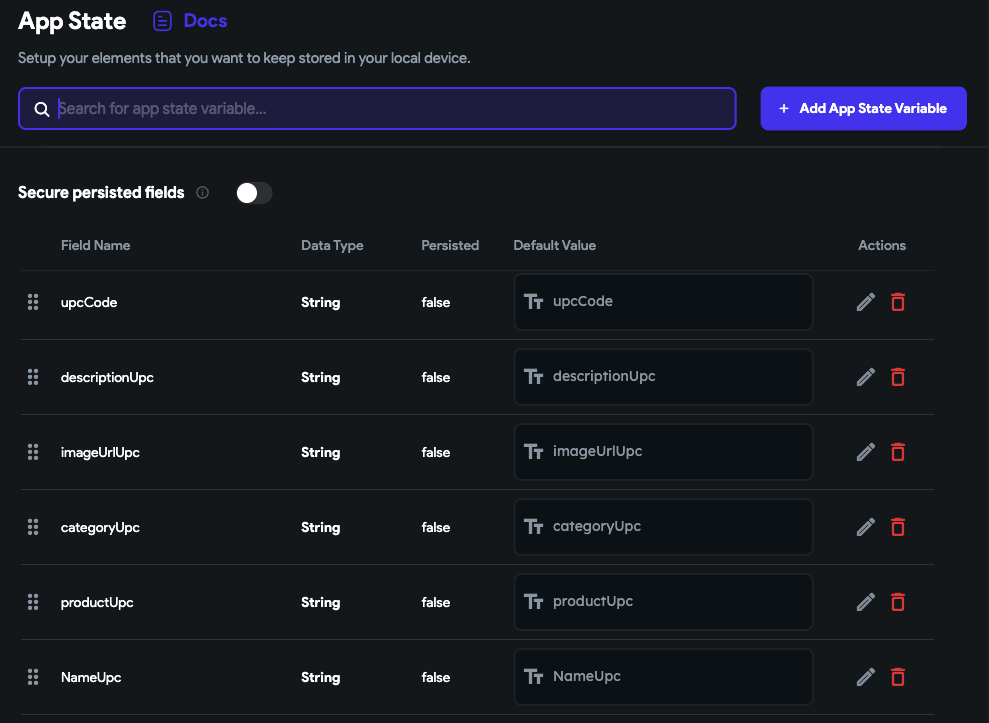
On the left side, select "AppState."
-
Click on "+ Add App State Variable."
- Name the variable and set the Data Type to
String. - Ensure "In List" and "Persisted" options remain unchecked.
- Name the variable and set the Data Type to
- Repeat the process to create additional variables for the data returned by the Go-UPC API as needed.
6. Configuring Widgets
- Set up widgets to display product information.
- Enter the barcode and click the search icon to fetch data.
- In the actions interface (under "Actions"), configure the flow
to save the returned data into the
AppStatevariables.
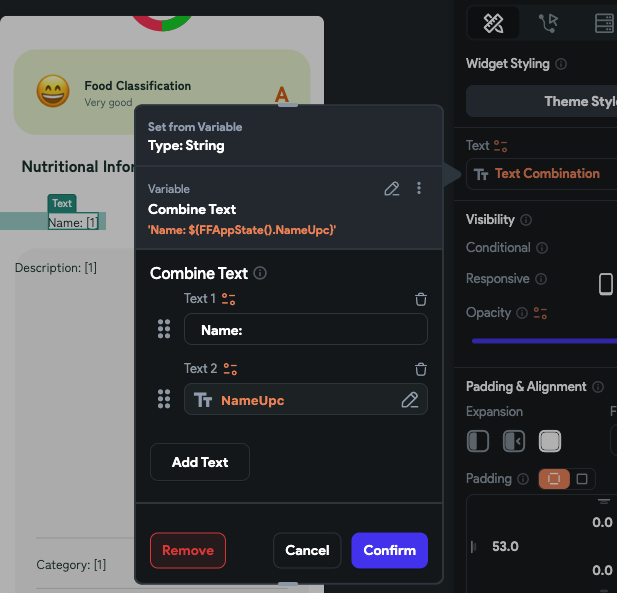
In this instance, notice that "NameUpc" is listed as
one of the variables created on the previous screen.
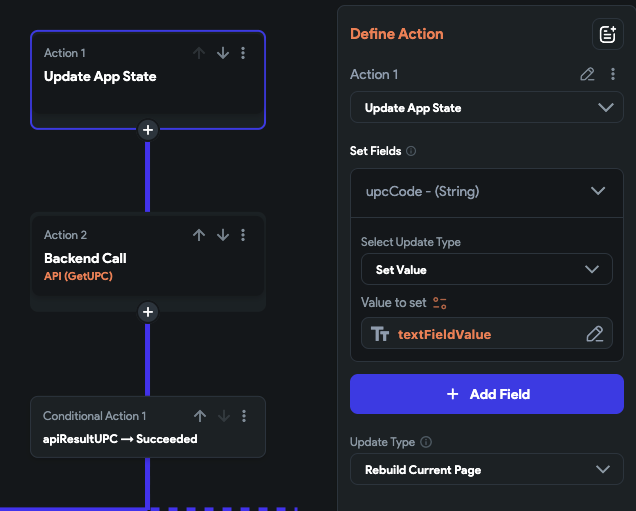
Another configuration image illustrates a similar setup, which is
not mandatory to follow exactly. In this example, the API call occurs
where the value stored in the AppState variable upcCode
is transferred to the API variable UPC_CODE, triggering
the Go-UPC API. The response is then saved in the Action Output Variable
Name apiResultUPC.
7. API Call in Action Flow
-
Configure the API call using the stored barcode value in the
AppStatevariableupcCode. -
Transfer the
upcCodevalue to the API variableUPC_CODE, triggering the Go-UPC API. -
Store the returned data in the Action Output Variable
apiResultUPC. -
Use a conditional statement to save the returned data in
AppStatevariables if the API call is successful.
8. Testing and Publishing
- Activate "RUN" mode in FlutterFlow to test the application.
- Enter a barcode into the configured widget to verify that the correct product information is displayed.
9. Publishing
- Once testing is complete and errors are resolved, publish your project.
Support and Documentation
For more details, refer to the Go-UPC API documentation or contact our support team.